SODAQ Universal Tracker
Intro
Follow the Getting Started guide to install the required boardfiles.
Versions
The SODAQ ONE has everything on board to be the perfect tracker.
The latest tracker software can be downloaded from our github.
ONE v1
Download the correct version for your board. Below we listed all versions.
One v1 – SODAQ Payload
https://github.com/SodaqMoja/SodaqOne-UniversalTracker
One v1 – Cayenne LPP
https://github.com/GabrielNotman/SodaqOne-UniversalTracker
ONE v2
One v2 – SODAQ payload and Cayenne LPP
https://github.com/SodaqMoja/SodaqOne-UniversalTracker-v2
ONE v3
One v3 – SODAQ payload and Cayenne LPP
https://github.com/SodaqMoja/SodaqOne-UniversalTracker-v3
This is the end of life version of the SodaqOne tracker made for the ONE v3.
Universal Tracker – SODAQ payload and Cayenne LPP
https://github.com/SodaqMoja/Sodaq_Universal_Tracker
This is the new Universal Tracker made for the ONE v3, AFF and SFF boards.
![]()
Unzip the packet.
Open the .ino file with the Arduino IDE.
Select the correct Board and Port and upload the sketch to your board.
Note
If you don’t see a port the Sodaq One is maybe in sleep.
1x reset the board will normal reset, tracker code has 30 seconds before it disconnects the usb.
2x reset in a second will manually put the Sodaq One into bootloader mode.
Configure your board
After compiling the source code and uploading it to the board you will be able to configure the board through a menu.
Open the Arduino Serial Monitor to see the bootup menu.
Make sure New Line and Carriage Return are enabled.
The bootup menu will close itself after 30 seconds.
When you don't see the menu send an (empty) command.
After every command the menu will reload with the latest parameters and the timer will reset.
The Serial Monitor needs te be closed in most cases before uploading a new sketch.
A power toggle and pressing the reset button require to close and re-open the Serial Monitor.
The LoRa HWEUI is shown, by default also in the dev= field. Write this Hardware EUI down, you will need it later.
Bootmenu commands / settings
EUI
When this command is executed the Hardware EUI will be displayed and placed in the DevAddr / DevEUI (dev=) field.
RESET
This will reset the RN2XX3 module. Use this command every time you make a change to the LoRaWAN settings.
CS
Store any changes in the memory of the board.
These settings will be kept after a reset of power cycle.
All settings will be erased when a new sketch is uploaded.
OK
Does the same as CS but also terminates the bootmenu. The program will start.
Fix Interval
A period in minutes when a GPS fix should start and be transmitted over the network.
Alternative Fix Interval
Within this period the Alternative Fix interval is used.
Leave all at zero's to disable this feature.
This can be used to lower the interval for example at night.
GPS Fix Timeout
The maximum time to leave the GPS on to get a fix.
Minimum sat count
The minimum to obtain a GPS fix is 3.
More satellites will result in longer on time, more battery usage. But also potentially a higher accuracy.
Num Coords to Upload
With LoRaWAN it's normal that not all messages are received. With this setting you can transmit up to a history of 3 last locations.
On-the-move Functionality
When the Acceleration% is set, this mode will be enabled.
When this feature is enable the Fix Interval can be disabled or set it to 1440 for a daily heartbeat.
The recommended percentage depends on your usage, typically 15-20% is used.
With the duration a threshold is set for how long this accelerometer percentage needs to be measured before trigger the interrupt. Leave at zero to immediately wake trigger an interrupt.
With the Fix Interval the interval period it set for when the device is in moving mode.
With the timeout the period is set for when there is no more movement detected.
With settings the acf=1 and act=10, the device will send his location every minute when moving and when stopped to move it will continue for 10 more minutes before going out of moving mode.
When there is a trigger from the accelerometer the timeout is reset.
OTAA
When enabled the Over-The-Air Activation method is used. Otherwise Activation By Personalization(ABP) is used.
Retry
When enabled, if an error with the modem occurs the modem will be reset and performs a rejoin to the network.
ADR
Adeptive Datarate, let the modem know they can decide for us which spreadingfactor we should use.
Only recommended for static devices.
ACK
Turn of/off acknowledgements.
Due to the dutycycles restrictions of LoRaWAN, this feature should be off.
Spreading Factor
With this setting you can set the fixed Spreading Factor.
For EU there is SF7, SF8, SF9, SF10, SF11 and SF12.
SF7 uses the least bandwith, least amount of transmit power. But also the range is the most limited.
SF12 used the most amount of power, high amount of transmit power. But you will have the longest range.
What you should use depends on your setup/requirement, keep this setting as low as possible.
Output power
If you use a different antenna you can change the output power here.
Recommended to leave on default. pwr=1 is the default.
Lora port
Most network use port 1 as data port.
With this setting you can change this.
LoRa Keys
Use DevEUI, AppEUI and AppKey when OTAA is used for activation.
Use DevAddr, AppSKey and NwkSKey when ABP is used for activation.
Cayenne LPP
When you want to use the MyDevices Cayenne dashboard enable this payload structure.
If this is disabled the standard SODAQ Binary payload is used.
Status LED
Enable/Disable LED functionality. The RED boot LED is always enabled.
Debug
Enable/Disable debug mode. When debug mode is enabled the USB will stay connected, the device will NOT go into low power when SerialUSB is used as debug stream.
RN2903
There is an issue with RN2903 that the current tracker payload does not fit in SF10.
In the menu settings we have to prevent to use SF10.
- Turn off ADR: adr=0
- Set Spreadingsfactor 7, 8 or 9: sf=9
Network
The Things Network
The Things Network provides a global open LoRaWAN network.
Create a free account and login to the console.
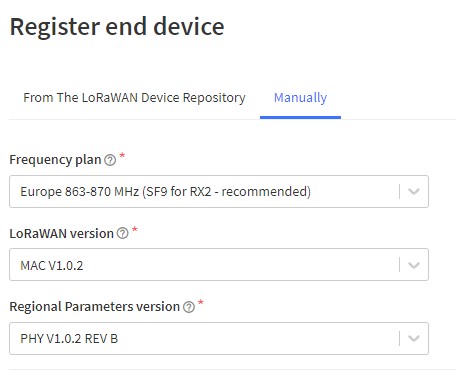
In TTN V3 you have to add the SODAQ ONE manually.
The selected LoRaWAN version depends on the RN Firmware version.
Use the RN2483FirmwareUpdater to update your RN module to the latest available version in your region.
In Europe the latest RN2483 firmware version is v1.0.5 which supports MAC V1.0.2
In Europe we use for TTN PHY V1.0.2 REV B, see also the screenshot below.
KPN
The Dutch Telecom provider KPN has an nation wide LoRaWAN network.
Create a developer account on the KPN Things Portal.
Other LoRaWAN Networks
The RN2XX3 is compliant with any LoRaWAN network.
Dashboard
We have tested the Universal Tracker Code with the following dashboards.
AllThingsTalk
Create your account on and sign-in on the AllThingsTalk Maker.
If you have an activation code, simply claim your device.
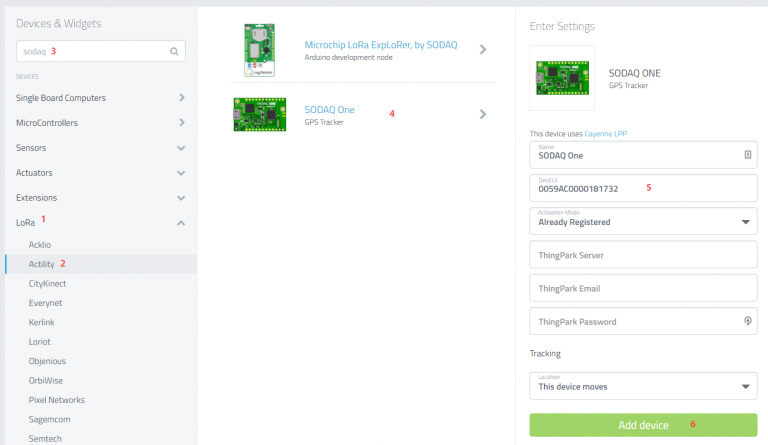
Cayenne from MyDevices
Enable the cayenne low power payload by sending cay=1 in the bootmenu of your device.
Create your account on and sign-in on Cayenne.
- Select LoRa.
- Select your network operator. (Actility for KPN)
- Search for SODAQ.
- Select the SODAQ ONE.
- Put in the Device EUI.
- Add device.
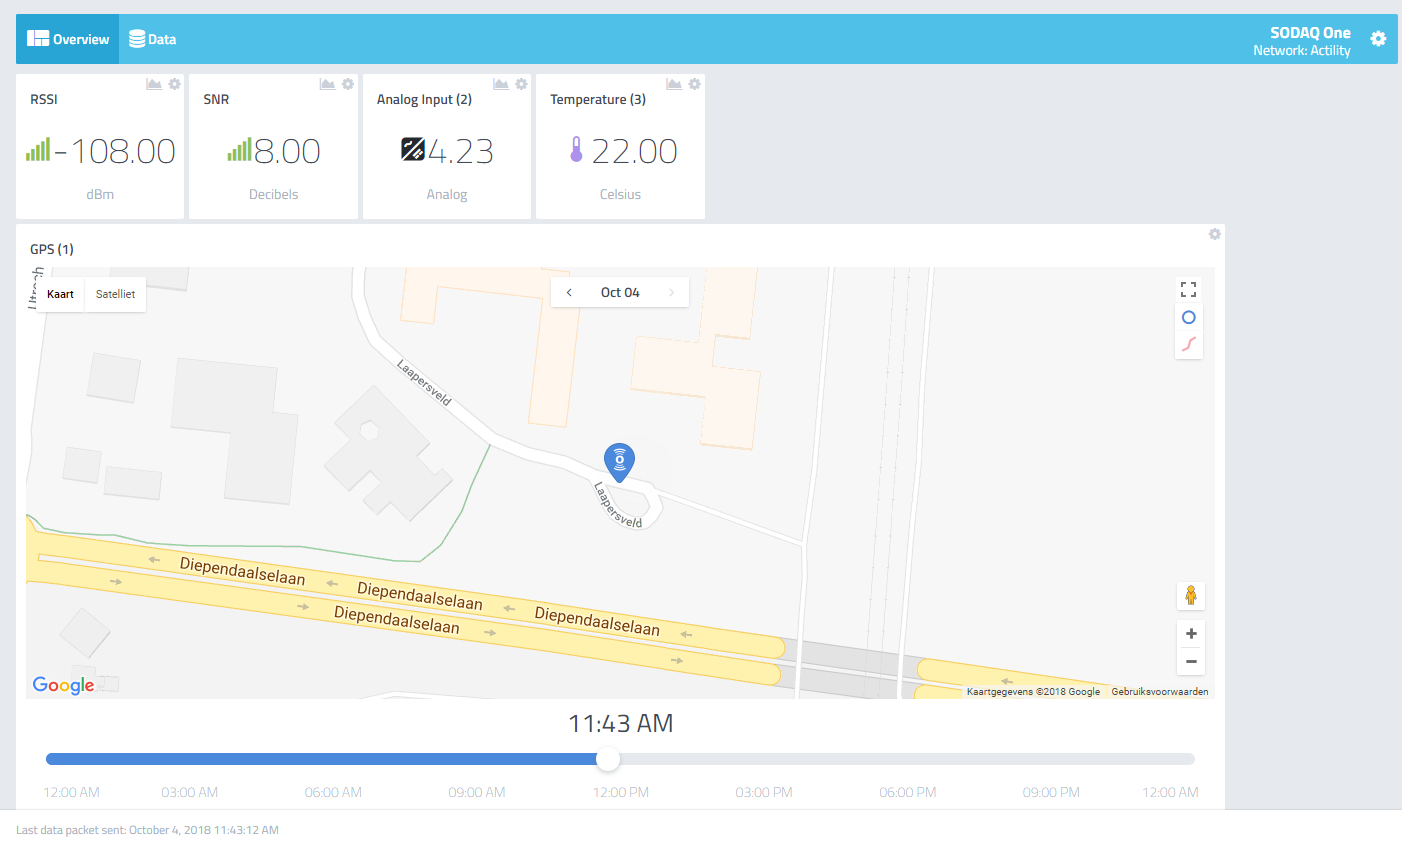
- Send a message, your data will automatically appear.
ThingsBoard
A Thingsboard tutorial will come soon.
Ubidots
Ubidots made a tutorial how to connect our SODAQ ONE sending over The Things Network and show it on the Ubidots dashboard.
Click here to see the Ubidots tutorial
Downlink
Example 1
We will send the following values in the downlink:
– Fix interval 23 minutes
– No Alternative fix interval
– GPS timeout of 120 seconds
Al values need to converted to hex, adjusted to correct length and converted to little endian.
Fix interval of 23 minutes
23 to hex = 17
Length correction: 00 17
Change to little endian: 17 00
No alternative fix interval:
00 00
00 00 00 00
00 00 00 00
GPS:
120 to hex = 78
Reserved Byte: 00
Combine the values:
1700 0000 00000000 00000000 7800
1700000000000000000000007800
If the queue the hex in your LoRaWAN network, the next time a message from the device is send it will sent the first queued message.
Example 2
We will send the following values in the downlink:
– Fix interval 30 minutes
– Fix Interval of 1 hour between 9.00 and 15:30
– GPS timeout of 120 seconds
Al values need to converted to hex, adjusted to correct length and converted to little endian.
Fix interval of 30 minutes
30 to hex = 1E
Length correction: 00 1E
Change to little endian: 1E 00
Alternative fix interval of 1 hour (60 minutes):
60 to hex = 3C
Length correction: 00 3C
Change to little endian: 3C 00
The EPOCH timer is in seconds.
From 9:00 can be encoded like:
(9*3600)+(0*60) = 32400 + 0 = 32400
32400 to hex = 7E 90
Length correction: 00 00 7E 90
Change to little endian: 90 7E 00 00
To 15:30 can be encoded like:
(15*3600)+(30*60) = 54000 + 1800 = 55800
55800 to hex = D9 F8
Length correction: 00 00 D9 F8
Change to little endian: F8 D9 00 00
GPS:
120 to hex = 78
Reserved Byte: 00
Combine the values:
1E00 3C00 907E0000 F8D90000 78 00
1E003C00907E0000F8D900007800
If the queue the hex in your LoRaWAN network, the next time a message from the device is send it will sent the first queued message.
Questions
You can ask us anything on our Forum.