Add GPRS connection to upload data
Note
This example builds on the previous example titled: Adding a Timer to Schedule Readings. Only the sections of code which have been changed or added are discussed here. However, a full copy of the complete sketch can be found at the end of this page.
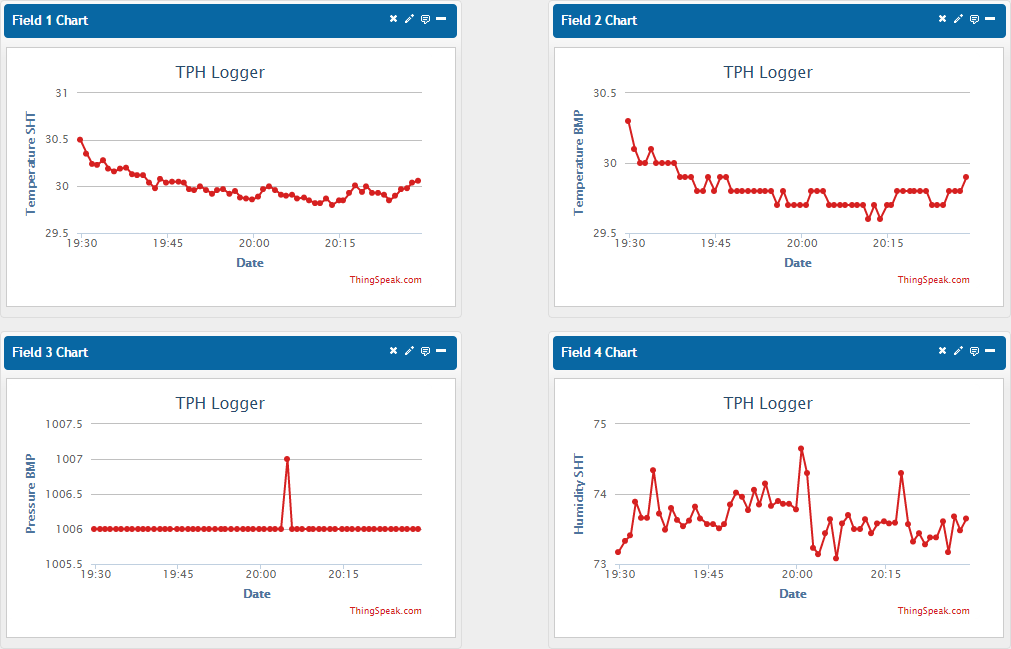
In this example we add functionality to connect to the web using a GPRS connection. Here we will be demonstrating how to send the sensor readings via a HTTP command to a website. Specifically, we use the ThingSpeak website which provides a simple and free API for logging data from a variety of devices and sensors.
Here are some example charts which were generated from data sent to a test channel on the ThingSpeak website:
ThingSpeak Setup
Here are the steps required in order to get this example working with the ThingSpeak website:
- Create an account with ThingSpeak (Sign-up).
- Create a new channel.
- Copy the WRITE API KEY for your new channel (see the API KEYS tab).
-
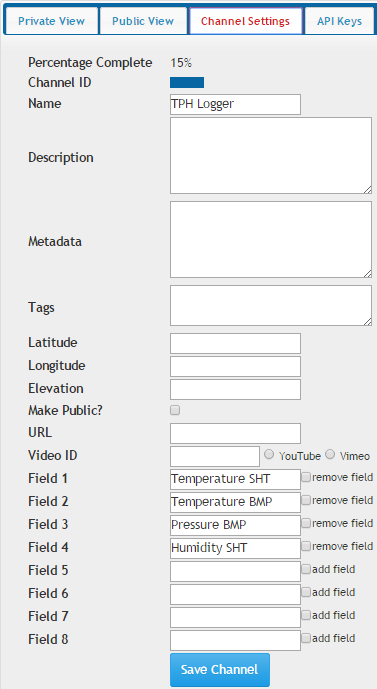
Configure your new channel (see the Channel Settings tab).
- You must to add four fields to your channel.
- You should name the channel and each of the fields.
- Make sure to save the new channel settings.
Note
The channel and field names are used for labeling the data in the charts shown on the private and public view tabs (see the image above). The names have no affect on the API and can be changed at any time.
Here are the settings of the channel used to test this example:
Additional Required Components
- GPRSbee Module
- Micro SIM
Additional Required Libraries
- GPRSbee
Library Installation
The GPRSbee library is included with the SODAQ Mbili files that you have already installed.
If necessary, refer to Section 2 of the Getting Started guide for details on where to download from and how to install the SODAQ Mbili files.
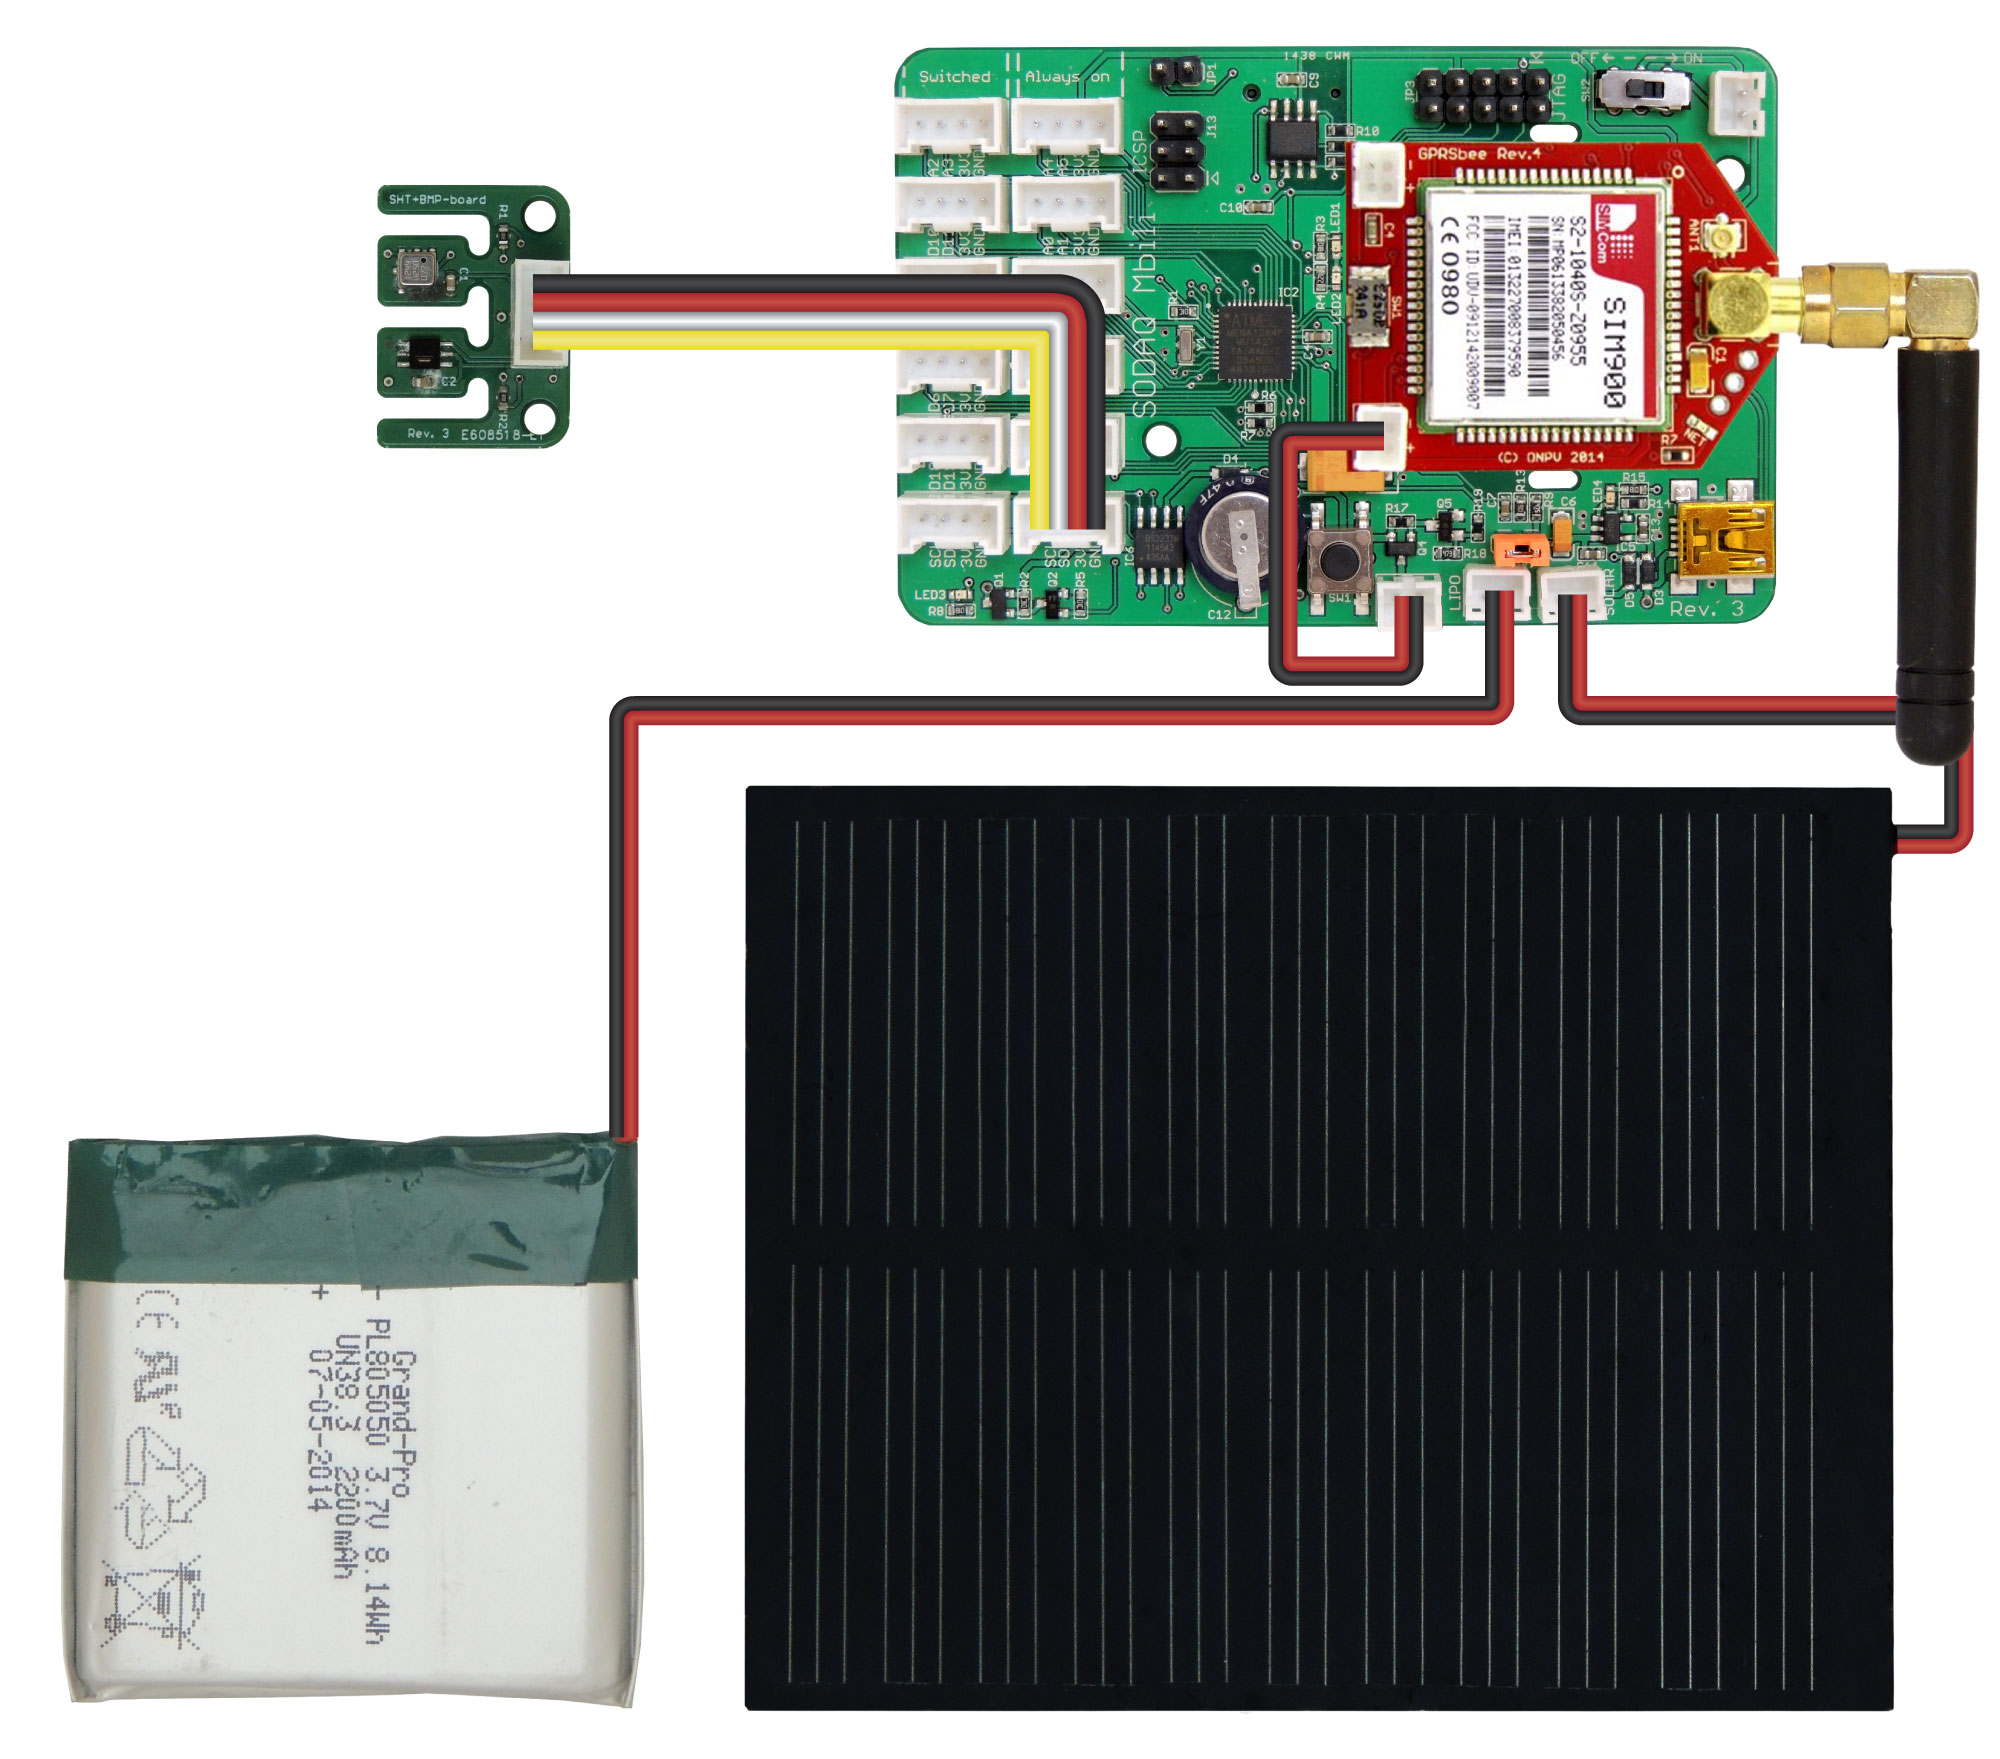
Hardware Setup
You should refer to the board diagram, the Grove sockets page, and the GPRSbee Connection for additional information..
- First, plug the TPH Sensor into the Grove I2C socket.
- Then, install the GPRSbee Module into the Bee socket.
- Next, using the wiring diagram for the Switched Power Method, plug the 1A LiPo battery and GPRSbee power connectors into their sockets.
- Finally, plug the 0.5W solar panel into its socket.
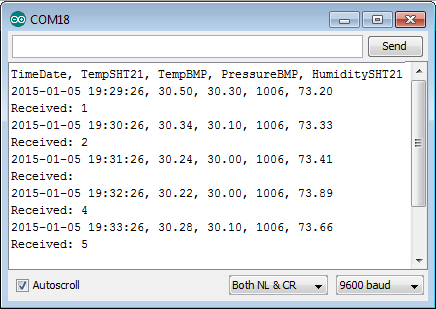
Turn on the SODAQ Mbili board, compile and upload the following sketch from the Arduino IDE onto the SODAQ Mbili board. Leave the USB cable plugged in and open the Serial Monitor (Ctrl-Shift-M) and ensure that it is set to the 9600 baud rate.
After you open the Serial Monitor (Ctrl-Shift-M), you should see output similar to this:
Additional Sketch Code
Library Includes
In addition to the existing libraries, we must now also include the GPRSbee library in the sketch using the #include compiler directive.
Globals
The ThingSpeak API limits data submission to a maximum of once every 15 seconds. Additionally, it takes some time to establish the GPRS connection before any data can be sent. For this reason, we adjust the READ_DELAY constant so that the readings are taken once per minute (the units are milliseconds).
We then define a series of constants which are used for setting up the GPRS connection and for sending the data to ThingSpeak. The constants APN, APN_USERNAME,and APN_PASSWORD need to be set to the correct values for your particular network. Additionally, WRITE_API_KEY needs to be set to the Write API Key value shown on the API KEYS tab of your ThingSpeak channel’s page. The other constants are used for formatting the data sent with the URL.
Note
The constants LABELX define the data labels for each of the fields. For the ThingSpeak API you must use the labels fieldN. However, if you are modifying this example to work with another site you can change the labels here to suit your needs.
Note
You can also submit the data to “184.106.153.149/update”, this can be useful if your network is unable to resolve the specified URL. You should try this if you are receiving 603 DNS Error responses (+HTTPACTION:0,603,0). You can see what the responses you are getting by enabling debugging (see the setupComms() section) and looking at the output in the Serial Monitor.
//The delay between the sensor readings
#define READ_DELAY 60000

//Network constants
#define APN "internet"
#define APN_USERNAME ""
#define APN_PASSWORD ""

//SpeakThings constants
#define URL "api.thingspeak.com/update"
#define WRITE_API_KEY "XXXXXXXXXXXXXXXX" //Change to your channel's key

//Seperators
#define FIRST_SEP "?"
#define OTHER_SEP "&"
#define LABEL_DATA_SEP "="

//Data labels, cannot change for ThingSpeak
#define LABEL1 "field1"
#define LABEL2 "field2"
#define LABEL3 "field3"
#define LABEL4 "field4"
setup()
In addition to the existing setup code, we make a call to the user defined method setupComms() which handles the initialization of the GPRSbee Module.
takeReading()
In addition to the existing code for taking the sensor readings, we also make a call to the user defined method createDataURL(). This method returns a String containing the target URL as well as the sensor data in a format that can be sent directly with a HTTP request. We then send the URL String over the GPRS connection with a call to the user defined methodsendURLData().
//Get the data record as a URL
String url = createDataURL();
//Send it over the GPRS connection
sendURLData(url);
setupComms()
Here we initialize the GPRSbee Module. The Bee socket on the SODAQ Mbili is connected to the second serial port which is accessed through the Serial1 object. We start with initializing Serial1 with a call to Serial.begin(). We then initialize the GPRSbee Module using the methodgprsbee.init(). The three parameters passed to this method include: the Serial object that the GPRSbee Module is connected to, the CTSВ pin (BEECTS), and the power pin (BEEDTR).
We must also make a call to gprsbee.setPowerSwitchedOnOff(), passing the argument true. This instructs the GPRSbee library to use the Switched Power Method. (The method that we wired the GPRSbee and battery for in the Hardware Setup section.)
Note
If you need to debug the GPRSbee Module, you can uncomment the line which calls the method gprsbee.setDiag(). This method connects the output from Serial1 to Serial so that any data sent over the Serial1 connection is also sent over Serial and is displayed in the Serial Monitor.
void setupComms()
{
//Start Serial1 the Bee port
Serial1.begin(9600);
//Intialise the GPRSbee
gprsbee.init(Serial1, BEECTS, BEEDTR);
//uncomment this line to debug the GPRSbee with the serial monitor
//gprsbee.setDiag(Serial);
//This is required for the Switched Power method
gprsbee.setPowerSwitchedOnOff(true);
}
createDataURL()
This method is similar in purpose to the existing user defined method createDataRecord(), which creates and returns a String containing the sensor readings in CSV format. However, instead of the CSV format, this method constructs a String which contains the target URL, the WRITE API KEY and the data from the sensor readings; all formatted for submission via a HTTP command to the ThingSpeak website.
String createDataURL()
{
//Construct data URL
String url = URL;
//Add key followed by each field
url += String(FIRST_SEP) + String("key");
url += String(LABEL_DATA_SEP) + String(WRITE_API_KEY);
url += String(OTHER_SEP) + String(LABEL1);
url += String(LABEL_DATA_SEP) + String(SHT2x.GetTemperature());
url += String(OTHER_SEP) + String(LABEL2);
url += String(LABEL_DATA_SEP) + String(bmp.readTemperature());
url += String(OTHER_SEP) + String(LABEL3);
url += String(LABEL_DATA_SEP) + String(bmp.readPressure() / 100);
url += String(OTHER_SEP) + String(LABEL4);
url += String(LABEL_DATA_SEP) + String(SHT2x.GetHumidity());
return url;
}
sendURLData()
Here we send the constructed URL String using a HTTP GET command. The reply from the ThingSpeak website is normally the entry number of that submission. If the result is 0 the data was not successfully submitted. You may notice that sometimes nothing is received. This does not necessarily mean that the data was not successfully submitted, it just means that no answer was received before a timeout occurred.
void sendURLData(String url)
{
char result[20] = "";
gprsbee.doHTTPGET(APN, APN_USERNAME, APN_PASSWORD, url.c_str(), result, sizeof(result));
Serial.println("Received: " + String(result));
}
Final Sketch Code
#include <Wire.h>
#include <SPI.h>
#include <SD.h>
//SODAQ Mbili libraries
#include <RTCTimer.h>
#include <Sodaq_BMP085.h>
#include <Sodaq_SHT2x.h>
#include <Sodaq_DS3231.h>
#include <GPRSbee.h>
//The delay between the sensor readings
#define READ_DELAY 60000
//Digital pin 11 is the MicroSD slave select pin on the Mbili
#define SD_SS_PIN 11
//The data log file
#define FILE_NAME "DataLog.txt"
//Data header
#define DATA_HEADER "TimeDate, TempSHT21, TempBMP, PressureBMP, HumiditySHT21"
//Network constants
#define APN "internet"
#define APN_USERNAME ""
#define APN_PASSWORD ""
//SpeakThings constants
#define URL "api.thingspeak.com/update"
#define WRITE_API_KEY "XXXXXXXXXXXXXXXX" //Change to your channel's key
//Seperators
#define FIRST_SEP "?"
#define OTHER_SEP "&"
#define LABEL_DATA_SEP "="
//Data labels, cannot change for ThingSpeak
#define LABEL1 "field1"
#define LABEL2 "field2"
#define LABEL3 "field3"
#define LABEL4 "field4"
//TPH BMP sensor
Sodaq_BMP085 bmp;
//RTC Timer
RTCTimer timer;
void setup()
{
//Initialize the serial connection
Serial.begin(9600);
//Initialize sensors
setupSensors();
//Initialise log file
setupLogFile();
//Setup timer events
setupTimer();
//Setup GPRSbee
setupComms();
//Echo the data header to the serial connection
Serial.println(DATA_HEADER);
//Take first reading immediately
takeReading(getNow());
}
void loop()
{
//Update the timer
timer.update();
}
void takeReading(uint32_t ts)
{
//Create the data record
String dataRec = createDataRecord();
//Save the data record to the log file
logData(dataRec);
//Echo the data to the serial connection
Serial.println(dataRec);
//Get the data record as a URL
String url = createDataURL();
//Send it over the GPRS connection
sendURLData(url);
}
void setupSensors()
{
//Initialize the wire protocol for the TPH sensors
Wire.begin();
//Initialize the TPH BMP sensor
bmp.begin();
//Initialize the DS3231 RTC
rtc.begin();
}
void setupLogFile()
{
//Initialize the SD card
if (!SD.begin(SD_SS_PIN))
{
Serial.println("Error: SD card failed to initialize or is missing.");
//Hang
while (true);
}
//Check if the file already exists
bool oldFile = SD.exists(FILE_NAME);
//Open the file in write mode
File logFile = SD.open(FILE_NAME, FILE_WRITE);
//Add header information if the file did not already exist
if (!oldFile)
{
logFile.println(DATA_HEADER);
}
//Close the file to save it
logFile.close();
}
void setupTimer()
{
//Instruct the RTCTimer how to get the current time reading
timer.setNowCallback(getNow);
//Schedule the reading every second
timer.every(READ_DELAY,В takeReading);
}
void setupComms()
{
    //Start Serial1 the Bee port
    Serial1.begin(9600);

    //Intialise the GPRSbee
    gprsbee.init(Serial1, BEECTS, BEEDTR);

    //uncomment this line to debug the GPRSbee with the serial monitor
    //gprsbee.setDiag(Serial);

    //This is required for the Switched Power method
    gprsbee.setPowerSwitchedOnOff(true);
}
void logData(String rec)
{
//Re-open the file
File logFile = SD.open(FILE_NAME, FILE_WRITE);
//Write the CSV data
logFile.println(rec);
//Close the file to save it
logFile.close();
}
String createDataRecord()
{
//Create a String type data record in csv format
//TimeDate, TempSHT21, TempBMP, PressureBMP, HumiditySHT21
String data = getDateTime() + ", ";
data += String(SHT2x.GetTemperature()) + ", ";
data += String(bmp.readTemperature()) + ", ";
data += String(bmp.readPressure() / 100) + ", ";
data += String(SHT2x.GetHumidity());
return data;
}
String createDataURL()
{
 //Construct data URL
 String url = URL;

 //Add key followed by each field
 url +=  String(FIRST_SEP) +  String("key");
 url +=  String(LABEL_DATA_SEP) +  String(WRITE_API_KEY);

 url +=  String(OTHER_SEP) +  String(LABEL1);
 url +=  String(LABEL_DATA_SEP) +  String(SHT2x.GetTemperature());

 url +=  String(OTHER_SEP) +  String(LABEL2);
 url +=  String(LABEL_DATA_SEP) +  String(bmp.readTemperature());

 url +=  String(OTHER_SEP) +  String(LABEL3);
 url +=  String(LABEL_DATA_SEP) +  String(bmp.readPressure() / 100);

 url +=  String(OTHER_SEP) +  String(LABEL4);
 url +=  String(LABEL_DATA_SEP) +  String(SHT2x.GetHumidity());

 return url;
}
void sendURLData(String url)
{
    char result[20] = "";
    gprsbee.doHTTPGET(APN, APN_USERNAME, APN_PASSWORD, url.c_str(), result, sizeof(result));
    Serial.println("Received: " + String(result));
}
String getDateTime()
{
String dateTimeStr;
//Create a DateTime object from the current time
DateTime dt(rtc.makeDateTime(rtc.now().getEpoch()));
//Convert it to a String
dt.addToString(dateTimeStr);
return dateTimeStr;
}
uint32_t getNow()
{
return millis();
}