GPRSbee
 The GPRSbee is a GPRS/GSM expansion board. The GPRSbee uses SIM cards of the MicroSIM form factor.
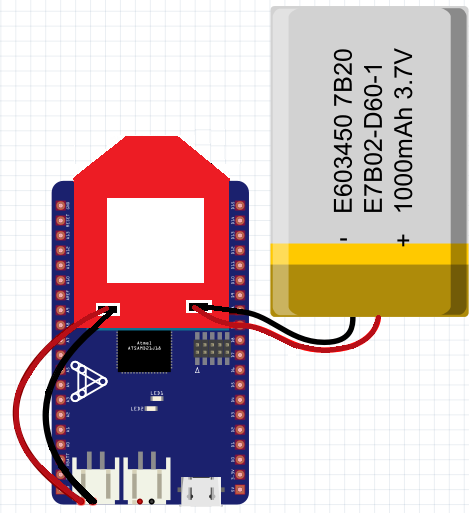
The core of this board is the well known SIM900 module. This module, like most other GPRS/GSM modules, has an operating voltage of 3.5 – 4.5 volt and can draw up to 2A power during broadcasts bursts. This makes the 3.3V power that the bee socket can provide unsuitable. This has been solved by powering the GPRSbee directly from a 3.7 volt LiPo battery.
To supply a sufficient amount power supply to the GPRSbee , a LiPo 3.7 volt battery has to be connected to one of the two JST connectors. The other JST connector can be used to power the main board with the supplied jumper cable.
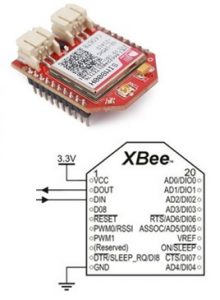
The GPRSbee uses DTR pin (pin 9) for software ON/OFF. Switching on is simply a matter of setting DTR pin to high.
The CTS pin (pin 12) is used for power status.. If the CTS pin is high the GPRSbee is on, if it is low it’s off.
Specifications
- SIM 900 module
- bee socket compatible
- 3.7 volt LiPo battery connector and board connector
- MicroSIM adapter
- SMA antenna connector
- Network Activity LED
- Manual ON/OFF switch
- Software ON/OFF through DTR pin
- Power status though CTS pin
- 3 V to 2.8V level converter
Wiring
GPRSBee has 2 JST power connectors, connect one of them to a 3.7 LIPO battery and the other JST to the LIPO JST of the Autonomo.
Example Sketches
Passthrough
#include <Arduino.h>

#define DEBUG_STREAM SerialUSB
#define MODEM_STREAM Serial1

#include <GPRSbee.h>

unsigned long baud = 115200;

void setup()
{
    DEBUG_STREAM.begin(baud);

    while ((!SerialUSB) && (millis() < 10000)) {
        // Wait 10 or continue when the serial monitor is opened.
    }

    MODEM_STREAM.begin(baud);

    pinMode(BEE_VCC, OUTPUT);
    digitalWrite(BEE_VCC, HIGH);

    pinMode(BEEDTR, OUTPUT);
    digitalWrite(BEEDTR, HIGH);
}

void loop()
{
    while (DEBUG_STREAM.available()) {
        MODEM_STREAM.write(DEBUG_STREAM.read());
    }

    while (MODEM_STREAM.available()) {
        DEBUG_STREAM.write(MODEM_STREAM.read());
    }
}
Send an SMS
/*
 * GPRS_SMS.ino
 *
 * Copyright (c) 2016 SODAQ.
 * Website    : http://sodaq.com/
 * Author     : Omar Hussein
 * Create Time: FEB 3, 2016
 *
 */
/*****************************************************************************/
//  Function:     Using GPRSBee with a Sim-Card , i will send a SMS Message
//                to a predefined Mobile number with a predefined message.
//  Hardware:     GPRSBee rev.4 SMA , Autonomo , Autonomo Grove Shield
//  Arduino IDE:  Arduino 1.6.6
/*****************************************************************************/
#include <GPRSbee.h>

bool sent_sms = false;

void setup()
{
    // The code will not start unless the serial monitor is opened or 10 sec is passed
    // in case you want to operate Autonomo with external power source
    while ((!SerialUSB) && (millis() < 10000));

    SerialUSB.begin(9600);
    SerialUSB.println("Here we start !! ");

    Serial1.begin(57600);
    gprsbee.initAutonomoSIM800(Serial1, BEE_VCC, BEEDTR, BEECTS);
    gprsbee.setDiag(SerialUSB);
}

void loop()
{
    // Check if we already send a previous message or not, since
    // we don't want to send the same message several times
    if (sent_sms == false) {
        sent_sms = true;
        SerialUSB.println("Switching on..");
        bool retval = gprsbee.on();
        SerialUSB.println( "...done. Retval = " );
        SerialUSB.println(retval);
        SerialUSB.println( "Sending SMS" );
        // phone number including the country code
        bool  smsSent = gprsbee.sendSMS( "+430000000000", "I <3 GPRSBee. " );
        if (smsSent) {
            SerialUSB.println( "SMS sent!" );
            // Set it True so we stop fullfilling the starting condition of the loop
            sent_sms = true;
        } else {
            SerialUSB.println( "SMS NOT SENT!" );
        }
    }
}
Sync the RTC
/*
 * This is an example to show how to use HTTP GET with GPRSbee
 * We're doing a GET of the SODAQ time service to set the RTC
 * of the SODAQ board.
 *
 */

#define APN "data.mono"
#define TIMEURL "http://time.sodaq.net/"

#include <Arduino.h>
#include <GPRSbee.h>
#include <Wire.h>
#include <RTCZero.h>

RTCZero rtc;

//######### forward declare #############
void syncRTCwithServer();
void initRtc();

void setup()
{
    SerialUSB.begin(57600);

    // The code will not start unless the serial monitor is opened or 10 sec is passed
    // in case you want to operate Autonomo with external power source
    while ((!SerialUSB) && (millis() < 10000));

    Serial1.begin(57600); // Serial is connected to SIM800 GPRSbee
    gprsbee.initAutonomoSIM800(Serial1, BEE_VCC, BEEDTR, BEECTS);
    gprsbee.setDiag(SerialUSB);

    SerialUSB.println("Program start");

    // Make sure the GPRSbee is switched off
    gprsbee.off();

    initRtc();

    syncRTCwithServer();
}

void loop()
{
    // Do nothing.
}

void syncRTCwithServer()
{
    char buffer[20];
    if (gprsbee.doHTTPGET(APN, TIMEURL, buffer, sizeof(buffer))) {
        SerialUSB.print("HTTP GET: ");
        SerialUSB.println(buffer);
        char *ptr;
        uint32_t newTs = strtoul(buffer, &ptr, 0);
        // Tweak the timestamp a little because doHTTPGET took a few second
        // to close the connection after getting the time from the server
        newTs += 3;
        if (ptr != buffer) {
            uint32_t oldTs = rtc.getEpoch();
            int32_t diffTs = abs(newTs - oldTs);
            if (diffTs > 30) {
                SerialUSB.print("Updating RTC, old=");
                SerialUSB.println(oldTs);
                SerialUSB.print(" new=");
                SerialUSB.println(newTs);
                rtc.setEpoch(newTs);
            }
        }
    }
}

/**
 * Initializes the RTC.
 */
void initRtc()
{
    rtc.begin();

    // This sets it to 2000-01-01
    rtc.setEpoch(0);
}