Ultrasonic ranger
 In this example we will demonstrate how to use an Ultrasonic Ranger to measure the distance of an object placed in front of the sensor and to display that distance reading in the Serial Monitor. This is another example of using the digital pins for input and output and for using the serial connection to send data to a USB connected PC. Additionally, we demonstrate the use of single digital pin both in INPUT and OUTPUT modes. This example also uses the pulseIn() method which measures the duration (in µs) of a digital signal received over a digital pin. Here this time value is then converted into a representative distance in centimeters and is displayed in the serial monitor. Additionally, an LED is lit up whenever the reading falls below a specified threshold.
Required Components
- SODAQ Mbili Board
- 0.5W Solar Panel
- 1aH Battery Pack
- Grove Ultrasonic Ranger
- Grove LED (any color)
- 2x Grove Cable (any length)
Required libraries
- none
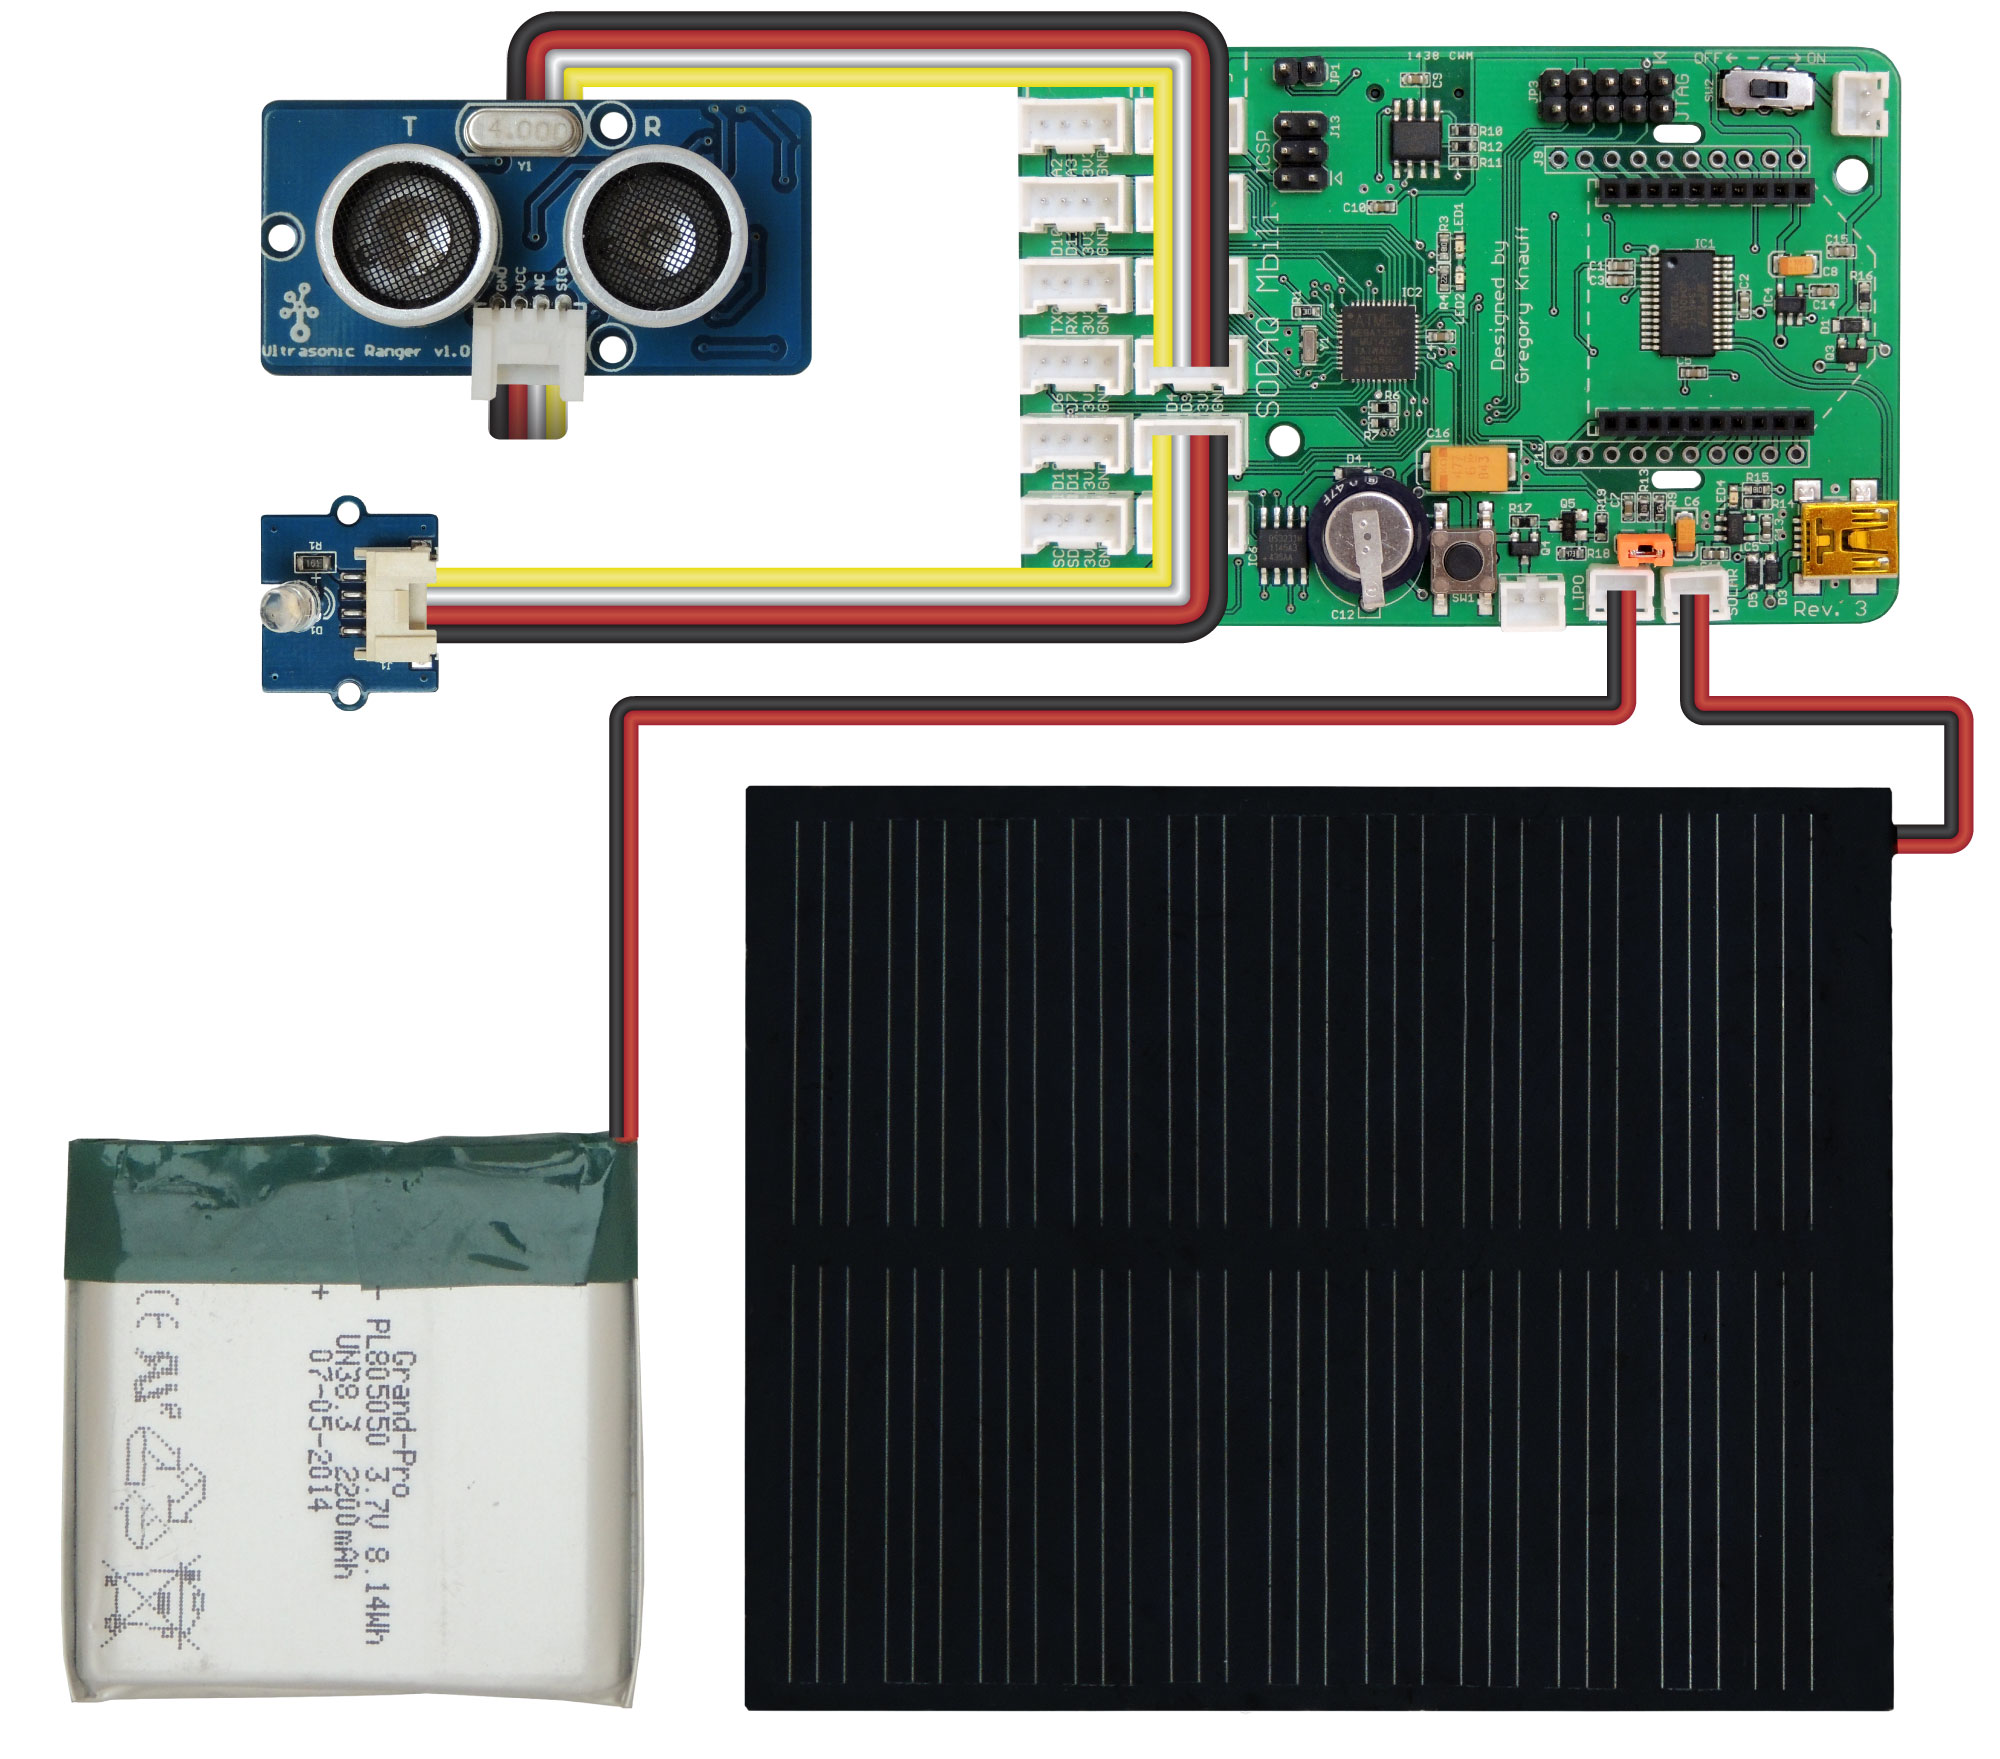
Hardware Setup
You should refer to both the board diagram and Grove sockets page for additional information.
- First, plug the Ultrasonic Ranger into the socket for the digital pins D4 D5.
- Then, plug the LED into the Grove socket for the digital pins D20 D21.
- Next, plug the 0.5W solar panel and the 1A LiPo battery into their respective sockets.
Turn on the SODAQ Mbili board, compile and upload the following sketch from the Arduino IDE onto the SODAQ Mbili board. Leave the USB cable plugged in and open the Serial Monitor (Ctrl-Shift-M) and ensure that it is set to the 9600 baud rate.
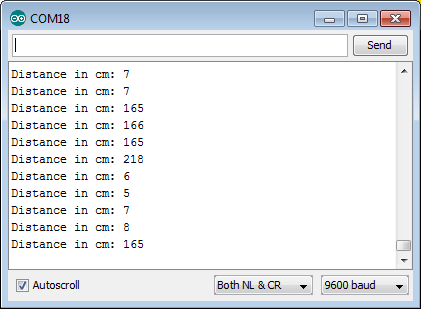
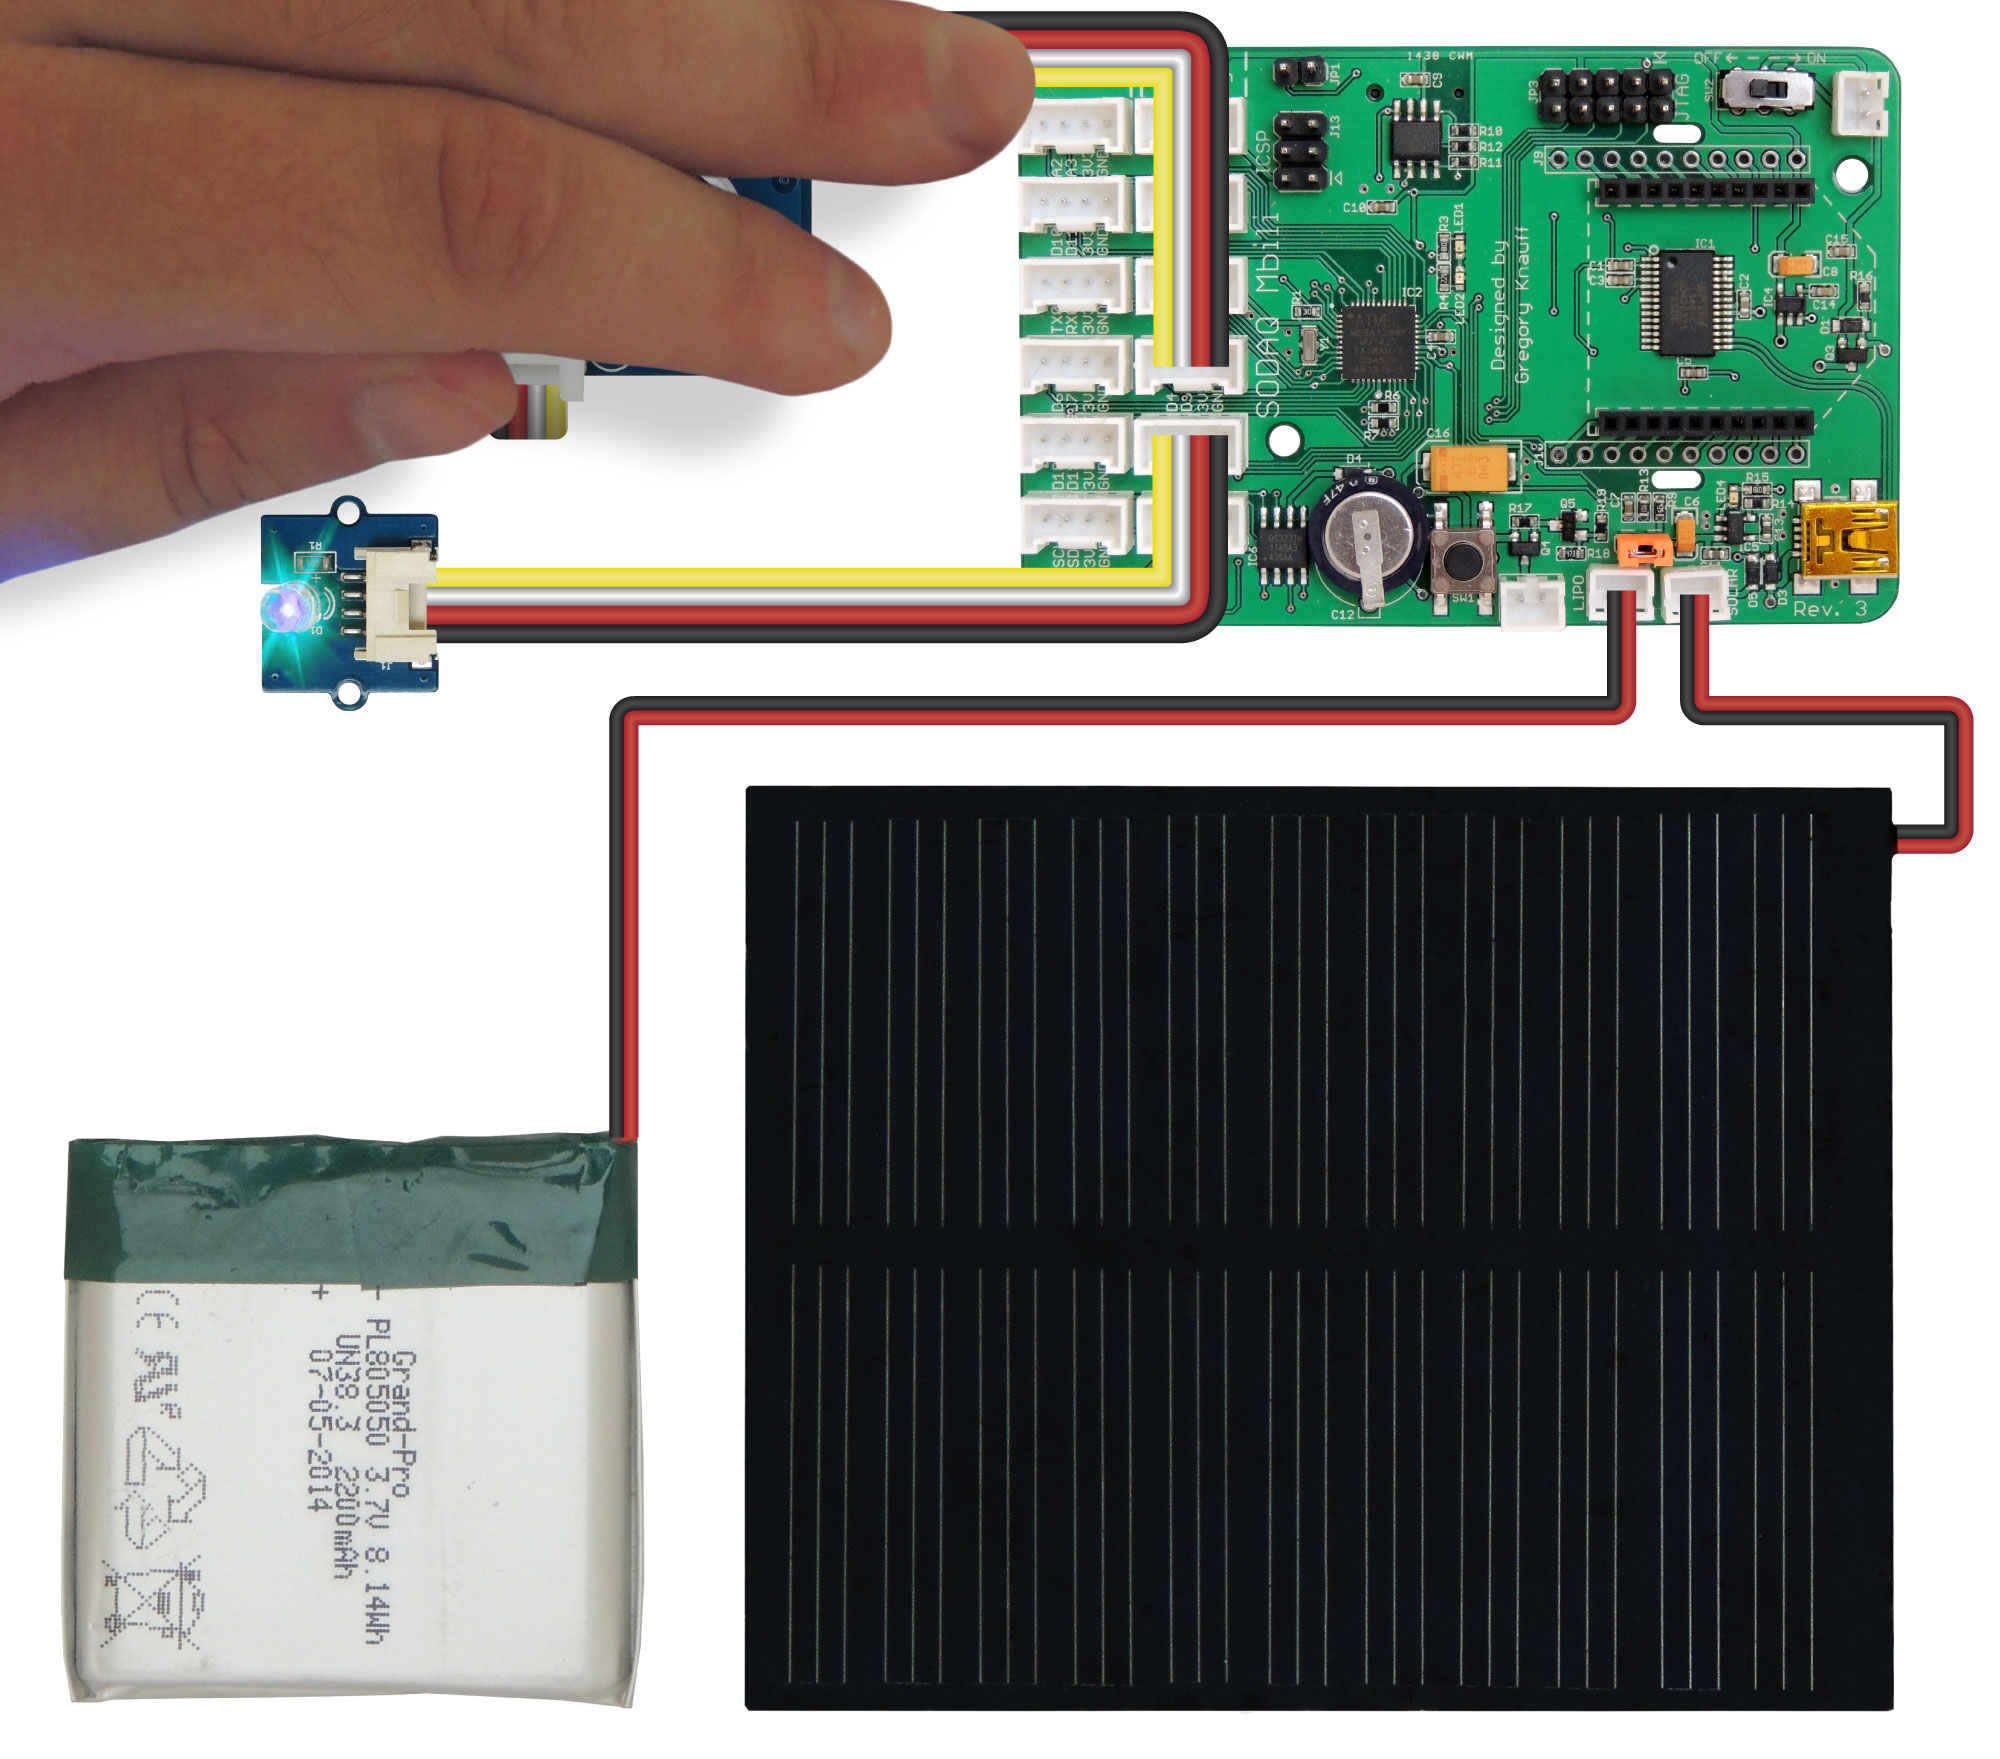
After you open the Serial Monitor (Ctrl-Shift-M), if move your hand over the Ultrasonic Ranger you should see output similar to this:
Sketch Code
#define PING_PIN 4 //Use digital pin 4 for the range finder
#define LED_PIN 20 //Use digital pin 20 for the LED
#define LED_LIGHT_DISTANCE 5 //At this distance (in cm) or less the LED is lit up
#define READ_DELAY 100 //Delay between readings in milliseconds

void setup()
{
    //Start the serial connection
    Serial.begin(9600);
    //Set the digital pin modes
    pinMode(LED_PIN, OUTPUT);
}

void loop()
{
    //Set Ping Pin to OUTPUT mode
    pinMode(PING_PIN, OUTPUT);
    //Send a HIGH signal for 5 microseconds
    digitalWrite(PING_PIN, HIGH);
    delayMicroseconds(5);
    digitalWrite(PING_PIN, LOW);

    //Now read back the distance as a time value (microseconds) using the same pin
    pinMode(PING_PIN, INPUT);
    long duration = pulseIn(PING_PIN, HIGH);

    //Convert the time into a distance
    long cm = microsecondsToCentimeters(duration);

    //Output the distance to the serial monitor
    Serial.println("Distance in cm: " + String(cm));

    if (cm < LED_LIGHT_DISTANCE)
    {
        //If the distance reading is equal to or less than
        //LED_LIGHT_DISTANCE switch the LED on
        digitalWrite(LED_PIN, HIGH);
    }
    else
    {
       //If not, turn the LED off
       digitalWrite(LED_PIN, LOW);
    }

    //Delay before the next reading
    delay(READ_DELAY);
}

long microsecondsToCentimeters(long microseconds)
{
  //The speed of sound is 340 m/s or 29 microseconds per centimeter
  //The ping travels twice the distance, there and back and so divide by 58
  return microseconds / 58;
}
Additionally, the LED will light up if your hand or another object is within 5cm of the sensor.
Sketch Code Breakdown
Globals
Here we specify which digital pins to use for both the Ultrasonic Ranger and the LED. Additionally, we specify the threshold distance at which the LED will be lit up, and the delay between taking readings.
#define PING_PIN 4 //Use digital pin 4 for the range finder
#define LED_PIN 20 //Use digital pin 20 for the LED
#define LED_LIGHT_DISTANCE 5 //At this distance (in cm) or less the LED is lit up
#define READ_DELAY 100 //Delay between readings in milliseconds
setup()
Here we start the serial connection with a call to Serial.begin(). Additionally, we set the digital pin we are using for the LED to OUTPUT mode. This is done through a call to pinMode().
Note
We do not at this point set the pin mode for the Ultrasonic Ranger. This is because we will be using it in both INPUT and OUTPUT modes and we will be switching between those modes in the method loop().
void setup()
{
    //Start the serial connection
    Serial.begin(9600);

    //Set the digital pin modes
    pinMode(LED_PIN, OUTPUT);
}
loop()
The Ultrasonic Ranger will activate its emitter whenever it is receiving a HIGH signal over the digital pin that it is connected to. Here we aim to switch on the emitter for a short burst in order to emit a ultrasonic ping.
This can be achieved with several steps. First we must set the connected digital pin to OUTPUT mode using pinMode(). Next we set the digital pin to HIGH. Then we add a short delay using the method delayMicroseconds() which only returns after the specified number of microseconds have elapsed. We then switch off the emitter by setting its digital pin to LOW. This results in the emitter of the Ultrasonic Ranger being activated for 5 microseconds.
void loop()
{
    //Set Ping Pin to OUTPUT mode
    pinMode(PING_PIN, OUTPUT);

    //Send a HIGH signal for 5 microseconds
    digitalWrite(PING_PIN, HIGH);
    delayMicroseconds(5);
    digitalWrite(PING_PIN, LOW);
}
Reading the Range Distance
The Ultrasonic Ranger measures the time it takes (in microseconds) for a ultrasonic ping to travel from its emitter, reflect off an object, and return again to its receiver. This travel time can then be read from the Ultrasonic Ranger as a digital pulse signal, with the duration of the digital HIGH pulse matching that of the ultrasonic ping time.
In order to get the reading from the Ultrasonic Ranger, we must first set its digital pin to INPUT mode. We then take a reading using the pulseIn() method which returns the duration of the digital signal it receives from the Ultrasonic Ranger. The reading in microseconds is converted to a distance value in centimeters using the user defined method microsecondsToCentimeters().
//Now read back the distance as a time value (microseconds) using the same pin
pinMode(PING_PIN, INPUT);
long duration = pulseIn(PING_PIN, HIGH);

//Convert the time into a distance
long cm = microsecondsToCentimeters(duration);
Using the Distance Reading
Here we write data to the outgoing stream buffer of the serial connection using the Serial.println() method. This data includes a text description and the distance reading from the Ultrasonic Ranger in centimeters. Additionally, an if/else conditional is used to determine whether to switch the LED on or off based on the distance reading and the threshold value LED_LIGHT_DISTANCE. Finally, we call the method delay() to wait the specified amount of milliseconds (READ_DELAY) before taking the next reading.
//Output the distance to the serial monitor
Serial.println("Distance in cm: " + String(cm));

if (cm < LED_LIGHT_DISTANCE)
{
    //If the distance reading is equal to or less than
    //LED_LIGHT_DISTANCE switch the LED on
    digitalWrite(LED_PIN, HIGH);
}
    else
{
    //If not, turn the LED off
    digitalWrite(LED_PIN, LOW);
}
    //Delay before the next reading
    delay(READ_DELAY);
}
microsecondsToCentimeters()
Here the value in microseconds is converted to the equivalent distance in centimeters (cm). Sound travels approximately 1 cm every 29 microseconds. The ultrasonic ping travels twice the distance of the object in front of the sensor, there and back again. So the value returned is that of the parameter value microseconds divided by 58 (= 29 * 2).